This Arepas Recipe is made with just three ingredients: white corn meal, water and salt - depending on what you fill them with makes them one or the other.
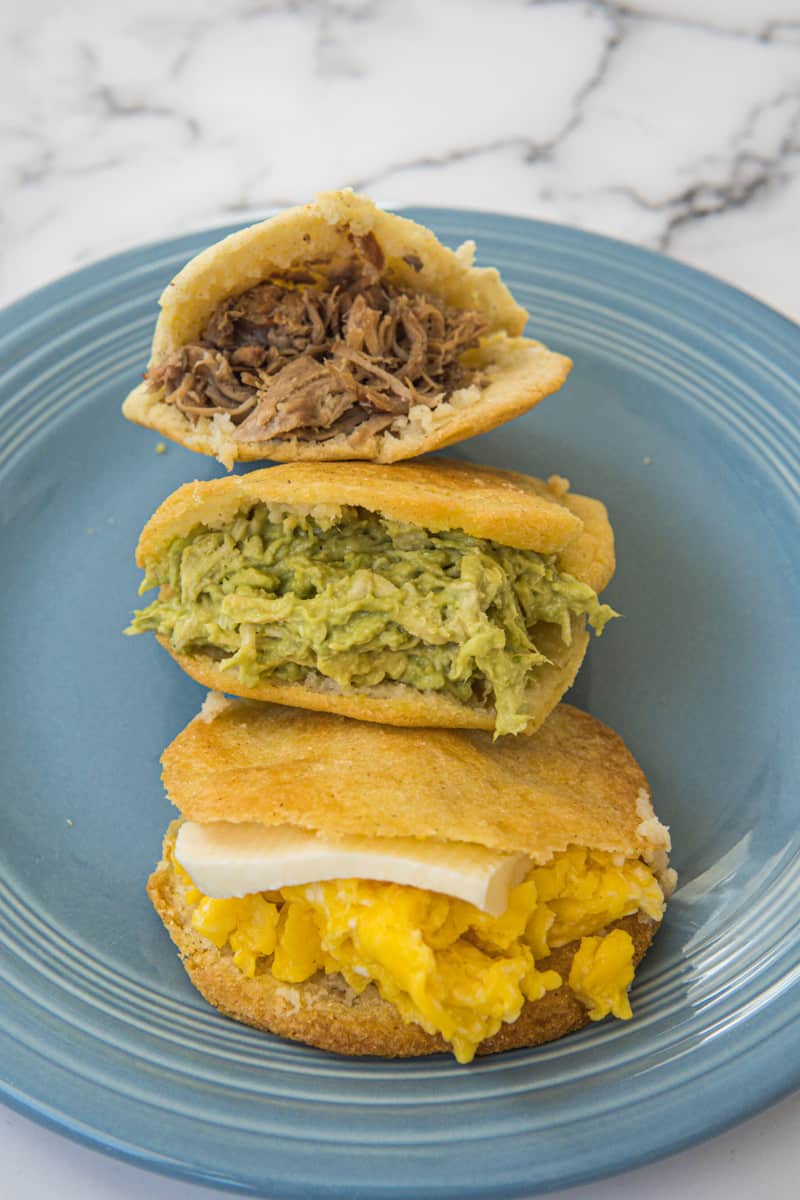
Welcome to the savory world of arepas! Originating from the culinary traditions of Latin America, specifically Venezuela and Colombia, arepas are a beloved dish that has gained international recognition for its deliciousness and versatility. These golden cornmeal patties, with their crispy exterior and soft, pillowy interior, serve as a canvas for an array of flavorful fillings and toppings. Whether you're a fan of meat, cheese, beans, or vegetables, there's an arepa variation to suit every taste. Join us on a culinary journey as we explore the rich history, regional variations, and mouthwatering possibilities of this beloved Latin American delight. Get ready to tantalize your taste buds and embark on an arepa adventure.
For this dish, I am filling the arepas with either Carnitas, scrambled eggs, queso fresco or reina pepiada. The reina pepiada is my favorite filling. This is a mixture of 1 cup of shredded chicken and a whole mashed avocado mixed together. Feel free to get as creative as you want for the filling.
Jump to:
What are Arepas?
Arepas are widely enjoyed in Venezuela, Colombia, and Panama and have been enjoyed in these countries for hundreds of years. Arepas are stuffed cornmeal cakes that are crispy outside and fluffy inside. The difference between the Colombian and Venezuelan arepas is that the Venezuelan style arepas are smaller and thicker while the Colombian arepas are typically sweeter, thinner and stuffed with cheese.
Why you will love this Arepas Recipe
- Versatility: Arepas can be filled with a variety of ingredients, allowing for endless flavor combinations and culinary creativity.
- Customizable: You can tailor the fillings and toppings to suit your preferences, making each arepa a personalized culinary experience.
- Ease of Preparation: Arepas are relatively simple to make, requiring just a few basic ingredients and minimal cooking equipment.
- Gluten-Free Option: Arepas are naturally gluten-free since they are made with cornmeal, making them suitable for individuals with gluten sensitivities or celiac disease.
- Anytime Meal: Arepas can be enjoyed at any time of the day – for breakfast, lunch, dinner, or even as a snack.
What type of cheese to use for Arepas?
When it comes to choosing cheese for arepas, there are several options that can complement the flavors and textures of this delicious dish. Here are some common types of cheese used for arepas:
- Queso Blanco: Queso blanco, which translates to "white cheese," is a popular choice for arepas. It is a mild and crumbly cheese that adds a creamy and slightly salty flavor to the dish. Queso blanco is often used in both Venezuelan and Colombian arepas.
- Queso de Mano: Queso de mano is a Venezuelan cheese specifically made for arepas. It has a slightly salty taste and a soft, stretchy texture, making it ideal for melting inside the arepa. Queso de mano is typically grated or sliced and used as a filling.
- Queso Costeño: Queso costeño is a Colombian cheese commonly used in arepas. It is a semi-hard, crumbly cheese with a slightly tangy and salty flavor. Queso costeño can be grated or sliced and added as a filling to the arepas.
- Mozzarella: Mozzarella cheese is a versatile option that can be used in arepas. It has a mild, creamy taste and melts well, giving the arepas a gooey and stringy texture when heated. Mozzarella can be used in both Venezuelan and Colombian arepas, especially for those who enjoy a stringy cheese pull.

Difference between Venezuelan and Colombian Arepas
Venezuelan and Colombian arepas are both popular variations of this traditional cornmeal dish, but they do have some key differences in terms of ingredients, preparation, and serving styles. Here's an overview of the main distinctions:
- Cornmeal Texture: Venezuelan arepas are typically made with pre-cooked white cornmeal known as "harina precocida." This type of cornmeal is more finely ground, resulting in a smoother and more tender texture. Colombian arepas, on the other hand, are typically made with "masarepa," which is also a pre-cooked cornmeal but has a coarser texture.
- Shape and Thickness: Venezuelan arepas are generally thicker and smaller in diameter compared to Colombian arepas. They are often formed into flat, round discs with a diameter of around 4-6 inches and a thickness of about half an inch. Colombian arepas, on the other hand, can come in various shapes and sizes, including larger and thinner versions.
- Filling and Toppings: While both Venezuelan and Colombian arepas can be filled with a variety of ingredients, the typical fillings and toppings can differ. Venezuelan arepas commonly feature fillings like shredded beef (reina pepiada), chicken, cheese (queso de mano or queso blanco), black beans, avocado, and various types of pork. Colombian arepas, on the other hand, often include fillings such as cheese (queso costeño), chorizo, hogao (a tomato and onion sauce), scrambled eggs, and other regional ingredients.
- Cooking Method: Venezuelan arepas are typically cooked on a griddle or skillet until they form a golden crust on the outside while remaining soft and moist on the inside. Colombian arepas are traditionally cooked on a hot griddle or a special flat grill called an "arepa maker," which applies direct heat and creates a crispy exterior.
- Regional Variations: Both Venezuela and Colombia have regional variations in their arepa preparations. For example, Venezuelan arepas from the Andean region may be stuffed with cheese and are thinner than the ones from other regions. Colombian arepas also have regional variations, such as the larger and thicker "arepas de choclo" made with fresh corn, which are popular in the Paisa region.

Arepas Recipe Ingredients
You'll only need a few simple ingredients to make this. The exact measurements are listed in the recipe card below. Here's an overview of what you'll need:
- Warm water
- Kosher salt
- White corn meal (P.A.N. brand)
- Vegetable oil
- Filling: Carnitas, scrambled eggs, queso fresco, or reina pepiada (recipe below)
See recipe card for Arepas Recipe quantities.
How to make Arepas
Preheat the oven to 350°F. Set a baking sheet with parchment paper.

In a large bowl, add the water and salt, until the salt dissolves. Slowly add the white corn flour and mix with a wooden spoon. Eventually, you will mix with your hands as you keep adding white corn flour. You do not want the dough to stick to your hands. If it is too dry, add more water. If it is too wet, add more flour. Usually it is equal parts water and white corn flour. Make a ball of dough with your hands and with your hand start molding the flour to make a saucer shape the size of the palm of your hand, about ¼ inch thick. If it cracks on the sides, you may need to add more water.

Heat a skillet on medium-high heat and add 2 tablespoons of oil. Cook for 2-3 minutes on each side, until golden brown.

Add the seared arepas onto the baking sheet and bake for 15-18 minutes until they puff up and more golden.

Cut open and add your favorite toppings.
Substitutions
Corn flour: The white corn meal I used is the P.A.N brand. Feel free to use any other brand you prefer.
Oil: You will need a nice light oil for frying, like vegetable oil, sunflower oil, grapeseed oil, or canola oil.
Filling: Carnitas, scrambled eggs, queso fresco or reina pepiada (recipe below)
Arepas Recipe Variations
- Traditional Arepas: Start with the classic version made from cornmeal (masa harina), water, and salt. Shape the dough into thick discs and cook them on a griddle or in a skillet until crispy on the outside and tender on the inside. Serve them hot with butter and cheese.
- Reina Pepiada Arepas: A Venezuelan favorite, these arepas are filled with a delicious combination of shredded chicken mixed with avocado and mayonnaise. The creamy and savory filling is a delightful contrast to the crispy arepa shell.
- Beef Arepas: Cook seasoned ground beef with onions, garlic, and spices like cumin and paprika. Stuff the arepas with the flavorful beef mixture, and top it off with cheese, lettuce, tomatoes, and any other desired toppings.
- Black Bean and Cheese Arepas: Spread a layer of refried black beans on the inside of the cooked arepas and top it with shredded cheese. Place the filled arepas back on the griddle or in the oven until the cheese melts. Serve with salsa or guacamole for added flavor.
- Shrimp Arepas: Sauté shrimp with garlic, onions, and peppers until cooked through. Stuff the arepas with the seasoned shrimp and add a squeeze of lime juice for a refreshing and tangy twist.
- Veggie Arepas: For a vegetarian option, fill the arepas with grilled or sautéed vegetables like bell peppers, zucchini, eggplant, and onions. Top it with crumbled cheese, salsa, or a drizzle of chimichurri sauce.
- Pulled Pork Arepas: Slow-cooked and seasoned pulled pork makes a fantastic filling for arepas. Top it with a tangy barbecue sauce or coleslaw for added flavor and crunch.
Check out these Gorditas con Maseca recipe for something similar.

Equipment
- Mixing Bowl: A mixing bowl is essential for combining the ingredients and forming the dough for the arepas.
- Measuring Cups and Spoons: Accurate measurements are important for achieving the right consistency in the dough. Measuring cups and spoons will help you measure the ingredients precisely.
- Whisk or Fork: You will need a whisk or fork to mix the dough ingredients thoroughly and ensure there are no lumps.
- Griddle or Skillet: A flat griddle or skillet is used to cook the arepas. Non-stick pans work well for this purpose. Make sure it's large enough to accommodate the size of the arepas.
- Spatula: A spatula is handy for flipping the arepas during cooking and ensuring even browning on both sides.
- Cutting Board: A cutting board provides a stable surface for shaping the arepas and can be used as a resting place before cooking.
- Cooling Rack (optional): If you prefer a crispier texture, place the cooked arepas on a cooling rack to allow air circulation and prevent them from becoming soggy.
How to store Arepas
- Cool Down: Allow the cooked arepas to cool down to room temperature before storing them. This helps prevent condensation and keeps them from becoming soggy.
- Wrap or Seal: Individually wrap each arepa in plastic wrap or place them in airtight containers. This helps maintain their shape and prevents them from drying out or absorbing odors from the refrigerator.
- Refrigeration: Store the wrapped or sealed arepas in the refrigerator. They can typically be kept for 2 to 3 days in the refrigerator while maintaining their taste and texture.
- Freezing (Optional): If you want to store arepas for a longer period, freezing is an option. Place the wrapped or sealed arepas in a freezer-safe bag or container. Properly sealed packaging helps prevent freezer burn. Label the bag or container with the date for easy reference.
- Freezer Duration: Arepas can be stored in the freezer for up to 3 months. Beyond that, the quality may start to deteriorate.
- Thawing: When you're ready to eat the stored arepas, remove them from the freezer and let them thaw in the refrigerator overnight. Thawing slowly in the refrigerator helps maintain their texture and taste.
- Reheating: To reheat the arepas, preheat a skillet or griddle over medium heat. Place the thawed arepas on the skillet and cook for a few minutes on each side until heated through and crispy. You can also reheat them in a toaster oven or oven set to a low temperature.
- Check for Freshness: Before consuming the reheated or thawed arepas, ensure they smell fresh and there are no signs of spoilage. If they appear or smell off, it's best to discard them.
Arepas Recipe Top tips
- Choose the Right Cornmeal: Use pre-cooked cornmeal specifically labeled as "masa harina" for making arepas. This type of cornmeal has been treated and is ideal for achieving the right texture and flavor.
- Adjust the Dough Consistency: When mixing the cornmeal with water or other liquids, gradually add the liquid and mix until you achieve a dough that holds together without being too dry or too sticky. Adjust the consistency by adding more cornmeal or liquid as needed.
- Rest the Dough: After mixing the dough, let it rest for 10-15 minutes. This allows the cornmeal to fully absorb the liquid and makes the dough easier to handle.
- Shape the Arepas: Divide the dough into portions and shape them into discs or patties. Use your hands to form smooth and even rounds. If the dough is sticky, wet your hands with water or oil to prevent sticking.
- Use High Heat: Preheat the griddle or skillet on medium-high to high heat before cooking the arepas. This ensures a crispy exterior while keeping the inside moist and fluffy.
- Cook with Oil or Butter: Lightly brush the griddle or skillet with oil or butter to prevent the arepas from sticking and to enhance their flavor.
- Don't Overcrowd the Pan: Leave enough space between the arepas on the griddle or skillet so they cook evenly and don't stick together. Cook them in batches if necessary.
- Flip with Care: When it's time to flip the arepas, use a spatula and handle them gently to avoid breaking them. Cook for an equal amount of time on both sides until they develop a golden brown crust.
- Finish Cooking in the Oven (Optional): If you find that the arepas are browning too quickly on the outside but are still undercooked inside, you can transfer them to a preheated oven at around 350°F (175°C) for 10-15 minutes to finish cooking.
- Slice Carefully: Once the arepas are cooked and slightly cooled, use a serrated knife to slice them open horizontally. Be careful not to cut all the way through to ensure a pocket for stuffing with your desired fillings.
- Be Creative with Fillings: Arepas can be filled with a variety of ingredients such as cheese, meat, beans, avocado, eggs, and vegetables. Explore different flavor combinations to suit your taste preferences.
- Experiment with Toppings: Serve arepas with a variety of toppings such as salsa, sour cream, guacamole, hot sauce, or chopped herbs to add freshness and extra flavor.

Arepas Recipe
- Total Time: 45 minutes
- Yield: 4 servings 1x
Description
These Arepas Recipe are made with just three ingredients: white corn meal, water and salt.
Ingredients
- 2 cups warm water
- 2 teaspoons kosher salt
- 2 cups white corn meal (I use P.A.N brand)
- Vegetable oil, for cooking
- Filling: Carnitas, scrambled eggs, queso fresco or reina pepiada (recipe below)
Instructions
- Preheat the oven to 350°F. Set a baking sheet with parchment paper.
- In a large bowl, add the water and salt, until the salt dissolves.
- Slowly add the white corn flour and mix with a wooden spoon. Eventually, you will mix with your hands as you keep adding white corn flour. You do not want the dough to stick to your hands. If it is too dry, add more water. If it is too wet, add more flour. Usually it is equal parts water and white corn flour.
- Make a ball of dough with your hands and with your hand start molding the flour to make a saucer shape the size of the palm of your hand, about ¼ inch thick. If it cracks on the sides, you may need to add more water.
- Heat a skillet on medium-high heat and add 2 tablespoons of oil. Cook for 2-3 minutes on each side, until golden brown.
- Add the seared arepas onto the baking sheet and bake for 15-18 minutes until they puff up and more golden.
- Slice the arepas and fill them with your favorite filling. This could be scrambled eggs or carnitas.
- (optional) My favorite filling is the reina pepiada. This is a mixture of 1 cup of shredded chicken and a whole mashed avocado mixed together.
Notes
- Choose the Right Cornmeal: Use pre-cooked cornmeal specifically labeled as "masa harina" for making arepas. This type of cornmeal has been treated and is ideal for achieving the right texture and flavor.
- Adjust the Dough Consistency: When mixing the cornmeal with water or other liquids, gradually add the liquid and mix until you achieve a dough that holds together without being too dry or too sticky. Adjust the consistency by adding more cornmeal or liquid as needed.
- Rest the Dough: After mixing the dough, let it rest for 10-15 minutes. This allows the cornmeal to fully absorb the liquid and makes the dough easier to handle.
- Shape the Arepas: Divide the dough into portions and shape them into discs or patties. Use your hands to form smooth and even rounds. If the dough is sticky, wet your hands with water or oil to prevent sticking.
- Use High Heat: Preheat the griddle or skillet on medium-high to high heat before cooking the arepas. This ensures a crispy exterior while keeping the inside moist and fluffy.
- Cook with Oil or Butter: Lightly brush the griddle or skillet with oil or butter to prevent the arepas from sticking and to enhance their flavor.
- Don't Overcrowd the Pan: Leave enough space between the arepas on the griddle or skillet so they cook evenly and don't stick together. Cook them in batches if necessary.
- Flip with Care: When it's time to flip the arepas, use a spatula and handle them gently to avoid breaking them. Cook for an equal amount of time on both sides until they develop a golden brown crust.
- Finish Cooking in the Oven (Optional): If you find that the arepas are browning too quickly on the outside but are still undercooked inside, you can transfer them to a preheated oven at around 350°F (175°C) for 10-15 minutes to finish cooking.
- Slice Carefully: Once the arepas are cooked and slightly cooled, use a serrated knife to slice them open horizontally. Be careful not to cut all the way through to ensure a pocket for stuffing with your desired fillings.
- Be Creative with Fillings: Arepas can be filled with a variety of ingredients such as cheese, meat, beans, avocado, eggs, and vegetables. Explore different flavor combinations to suit your taste preferences.
- Experiment with Toppings: Serve arepas with a variety of toppings such as salsa, sour cream, guacamole, hot sauce, or chopped herbs to add freshness and extra flavor.
- Prep Time: 15 minutes
- Cook Time: 30 minutes
- Category: Dinner
- Method: Cooking
- Cuisine: Colombian
Nutrition
- Serving Size: 1
- Calories: 122.2
- Sugar: 0.0 g
- Sodium: 779.1 mg
- Fat: 0.0 g
- Saturated Fat: 0.0 g
- Carbohydrates: 25.6 g
- Fiber: 0.0 g
- Protein: 2.2 g
Food safety
- Cook to a minimum temperature of 165 °F (74 °C)
- Do not use the same utensils on cooked food, that previously touched raw meat
- Wash hands after touching raw meat
- Don't leave food sitting out at room temperature for extended periods
- Never leave cooking food unattended
- Use oils with high smoking point to avoid harmful compounds
- Always have good ventilation when using a gas stove



Leave a Reply